Creating a Workflow
A basic three stage workflow is automatically created by the workflow engine. You can customize the pre-created workflow, and add the required additional stages, actions, validations, and so on. The following sample procedure describes the steps to add a stage and add an action to the stage.
Steps
- In the module menu, click Administration.
- In the navigation pane, click Workflow Management.
The Workflow List page is displayed. - Click New.
The New Workflow page is displayed.
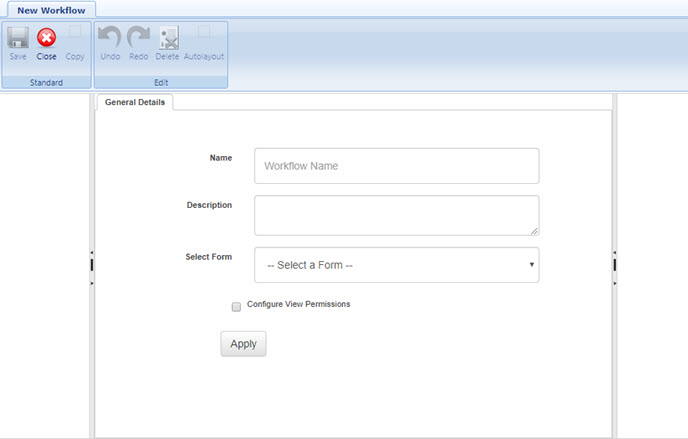
- To add information about the workflow, in the General Details tab, perform the following steps:
- In the Name box, enter the name of the workflow.
- In the Description box, enter the description for the workflow.
- From the Select Form drop-down list, select the form for which the workflow is being created. The options available are all forms available in the application. For example, to create a workflow for document management, select Document Management from the Select Form drop-down list.
To create a new business process, the first step is to create the form, and then create the workflow. - To select stakeholders who can view records in a stage but not perform any workflow actions, select the Configure View Permissions check box.
- Click Apply.
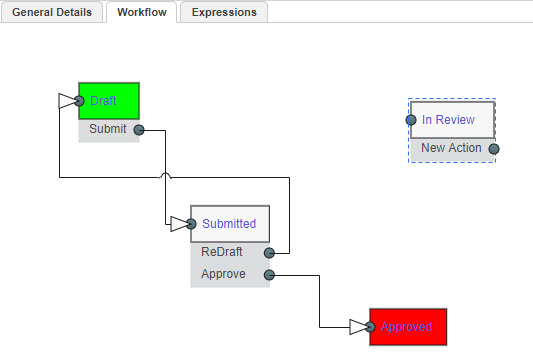
A pre-created three-stage workflow is displayed in the Workflow tab.
- To add a stage to the workflow, perform the following steps:
- In the Actions navigation pane, drag the Stage action item to the Workflow tab.
The new stage item is displayed in the canvas. - In the Workflow tab, click the Stage item.
the stage properties are displayed in the right-pane, as shown in the following image:

- In the Name box, enter the name of the stage.
For example, enter In Review. - In the Days to Complete box, enter the number of days before which an action must be performed in the current workflow stage. If the stakeholder does not perform an action in the specified number of days, an escalation email is sent to users in the Administrator role.
- Click in the Action Stake Holders box, and select the roles with which a user can perform the workflow action for the stage. The Action Stake Holder box lists all the roles that are defined in the application.
For information on roles, refer Security Roles.
Note:
- For a role to be available in the list of action stakeholders, the Edit permission must be enabled for the form for the role. To modify permissions, refer Editing Role Information.
- Ensure that the stakeholders selected in the Action Stake Holders box are also selected in the View Stake Holders box. - Click in the View Stake Holders box, and select the roles with which a user can view the records that are in the workflow stage but not perform any workflow actions.
The View Stake Holders box lists roles that are defined in the application.
For information on roles, refer Security Roles.
Note: You can view the View Stake Holders box only if the Configure View Permissions check box is selected in the General Details tab. - From the Delete Validation options, click one of the following options:
- Allow: You can delete a record at the workflow stage.
- Dont Allow: You cannot delete a record at the workflow stage.
- Custom: You can customize delete validations through Java scripts. For example, you can allow delete only when date is more than 10th Feb, 2019. - To send a standard automated email notification to the action stakeholders of the subsequent stage whenever the workflow action is performed, select the Send EMail To Stakeholders check box.
Alternatively, you can send customized email notifications to stakeholders using the Mail Merge feature. For information on sending custom email notifications, refer Configuring email notifications. - To list the subsequent workflow action in the My Tasks list of all stakeholders of the subsequent workflow stage, select the Show stage in Tasks check box.
- To configure the automated email to be sent when a stakeholder at the current workflow stage initiates the Ball in Court notification to a non-stakeholder, and the response email to be sent to the initiator, perform the following steps:
- From the Ball In Court Request Email Template drop-down list, select the required email template to be used to send an automated notification to the user selected to receive form information using the Ball in Court feature.
Available templates are based on the form that is selected for the workflow.
Available options are templates defined for the form in the Mail Body Templates catalog of the Library.
For information on the Ball in Court feature, refer Common Application Features, Ball in Court. - From the Ball In Court Response Email Template drop-down list, select the required email template to be used to send an automated response notification to the user who initiated the Ball in Court notification.
Available templates are based on the form that is selected for the workflow.
Available options are templates defined for the form in the Mail Body Templates catalog of the Library.
For information on the Ball in Court feature, refer Common Application Features, Ball in Court.
- From the Ball In Court Request Email Template drop-down list, select the required email template to be used to send an automated notification to the user selected to receive form information using the Ball in Court feature.
- Click Apply.
- In the Actions navigation pane, drag the Stage action item to the Workflow tab.
- To add an action to the workflow stage, perform the following steps:
- In the right pane, click Add Action.
Alternatively, right-click the new stage item in the canvas, and then click New Action.
The New Action box is displayed below the new stage as illustrated in the following image:
- Click the New Action item in the canvas. The properties of the action item are displayed in the right pane.
- In the Name box, enter the name of the new action.
For example, enter Review Complete.
- In the right pane, click Add Action.
- You can associate a checklist to an action to ensure that mandatory activities in the checklist are marked as Complete before the workflow stage transition occurs. To associate a checklist to the action, perform the following steps:
- From the Associate Checklist drop-down box, select the required checklist. Available options are based on the form that is selected for the workflow. Available options are checklists defined for the form in the Checklist catalog of the Library. For information on configuring checklists for a form, refer Library Management, Standard Library Catalogs, Form Checklists.
- Select the Make Comments Mandatory check box to ensure comments are provided mandatorily in the checklist before performing the next workflow action.
- In the definition section, click Apply. The action with the associated checklist is added to the workflow stage.
Note: To delete an action, right-click the action item, and click Delete Action. - To define the workflow status to be displayed on the list page of the form, perform the following steps:
- From the Actions navigation pane, drag Activities to the canvas.
The Activities box is displayed on the canvas. - In the Actions navigation pane, drag Set Form Status and drop it into the Activities box.
The Set Form Status box is displayed in the Activities box. - In the Activities box, click Set Form Status.
The right pane displays the definition section to define the Form Status for the workflow.
The workflow status of the form is displayed as defined here. - In the Name box, enter the name of the form status.
- In the Status box, enter the status that has to be displayed on the list page of the form.
For example, Reviewed. - Click Apply.
- To connect workflow items to complete the business process, perform the following steps:
- Click the port at the Submit action item, and drag the port of the Submit action item to the port of the In Review stage.
- Click and drag the port of the Review Complete action item to the port of the Activities item.
- Click and drag the port of the Activities item to the port of the Submitted stage.
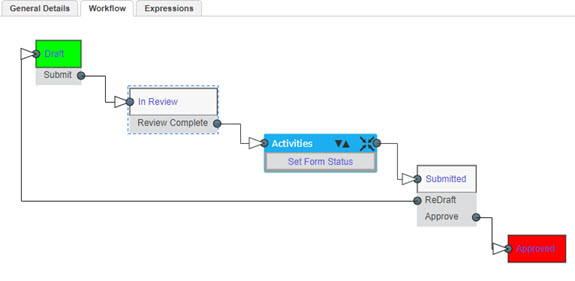
- Click Apply.
- From the Actions navigation pane, drag Activities to the canvas.
- To define conditions on the users performing a workflow action, perform the following steps:
- Click the required port.
The Workflow Connection action is displayed on the right pane. - In the Perform Operation After section, click the required option:
- Any user completes action: To specify that if any of the action stakeholders transition the record to the next workflow stage, the record moves to the next workflow stage.
- All user(s) complete action: To specify that all the action stakeholders must transition the record to the next workflow stage for the record to move to the next workflow stage.
- Click the required port.
- You can send customized automated notifications to stakeholders when the associated form is transitioned from one workflow stage to the next workflow stage.
To customize workflow email notifications, perform the following steps:- Select the Notify Through Email check box to send a customized email notification to both, the application's inbox and external email addresses.
- Click in the To field, and select the required role to send the email notification.
Available options in the list are roles that are defined in the application with necessary permissions.
For information on roles, refer Security Roles. - Click in the CC field, and select the required roles to send a copy of the email notification.
Available options in the list are roles that are defined in the application with necessary permissions. For information on roles, refer Security Roles. - To send notifications to external email addresses, in the To box or CC box, enter the external email addresses.
- From the Select Mail Body Template drop-down list, select the required mail body template that must be sent to the stakeholders.
Available templates are based on the form that is selected for the workflow.
Available options are templates defined for the form in the Mail Body Templates catalog of the Library. - In the Attachments section, perform the following steps:
- Select the Form Attachment(s) check box to send the notification with the files that are attached to the record for which the workflow action is performed.
- Select the Workflow Comments Attachment(s) check box to send the notification with the files that are attached with the workflow comments.
- From the Mail Merge drop-down list, select the required mail merge template. Available options are mail merge templates configured for the selected form. For information on Mail Merge, refer Common Application Features, Mail Merge.
- Click Apply.
Note: By default, the port is located on the right of the box. If required, to change the location of the port right-click the new action item and select Reverse Port. - In the New Workflow page, click Save.
The workflow is saved and listed on the Workflow List page. - Once the workflow is created, you need to publish the workflow. Publishing a workflow makes the workflow available to the systems. That is, workflow action buttons are made available in a form when a new instance of the associated form is created in the relevant list page in Masterworks.
To publish a workflow, perform the following steps:- In the Workflow List page, select the newly created workflow that has to be published.
- In the Others group, click Publish.
You can also un-publish a workflow. This is used when a form already associated with an existing workflow, has to be assigned with the newly created workflow. You can un-publish the earlier workflow by selecting the published workflow that has to be unpublished and then click Un-Publish in the Others group.